Saturday, June 27, 2015

Stash swatch - Andrea Fulerton Beatrice

Hello lovelies!

Another swatch post for you guys today. Today's polish is another Andrea Fulerton polish called Beatrice. First, let me show you the bottle shot.


I saw that in Superdrug and immediately thought, oil slick in a bottle...at a drugstore?? WANT!! So, I got it. Fast forward to two years later and I'm berating myself for still not having tried this gorgeous looking polish. So, I got a couple of coats on my nails, held my breath in anticipation of the magic....and nothing. 

NailaDay: Andrea Fulerton Beatrice

Not that it isn't a beautiful color. It's a GORGEOUS color and if it had looked just like that in the bottle, I would have been very happy. But I was expecting an oil slick on my nails and all I got was this pretty purple. 

NailaDay: Andrea Fulerton Beatrice


I even tried applying it over black. (Pssst, it's over black on the ring finger!) It gave the edges a darker look but, alas, no duochrome still. Oh well, I'll be happy wearing it as a purple color and look elsewhere for my oil slick look. 
In other news, I'll be going back to work on Monday after my maternity leave. I hope not to leave this blog in the lurch and try to do about a post a week but we all know how well that went last time. I'm happy to be going back to work but I'll miss my babies :-( 

Anyway, I'm sure all of you have stories of polishes that looked amazing in the bottle only to fool you once you wore it on your nails. What has been your biggest disappointment? Do you like wearing it anyway? I'd love to hear from you guys. Thanks for looking!

Monday, June 22, 2015

Stash swatch - Andrea Fulerton Foxy Lady trio set

Hello hello readers!

Casa de Nailaday has been a little chaotic this past week. Toddler boy started daycare last week and it's been an adjustment for all of us. I'm glad I started it a couple of weeks before I will be going back to work because dealing with a newborn baby, a clingy moody toddler and work would have been difficult, to say the least. To top it all off, the poor kid got a bug from his first week at daycare and has been feverish and cranky all weekend. My parents were over to hang out with the babies this weekend and we all just felt so sorry for him!

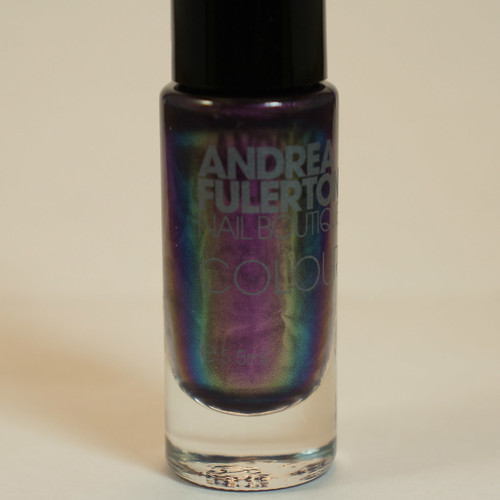
Anyway, it's time for another post! Today I'd like to show you a swatch of a polish "trio". I picked up this Andrea Fulerton Trio during my trip to London in 2012. (Yup, another one! We're not going to run out of these for a while.) This Andrea Fulerton Trio is called 
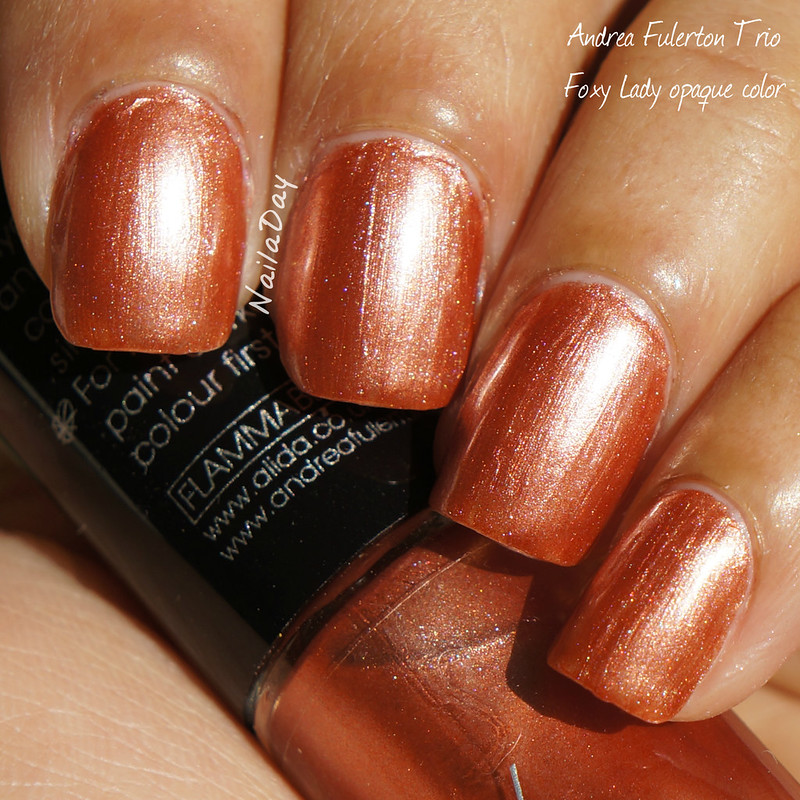
Foxy Lady. There are two polishes, one somewhat more sheer than the other. They are both wearable on their own. The third polish comes in when you layer the polishes together. This is the only trio from this brand I picked up. Let's see the polishes!

NailaDay: Andrea Fulerton Foxy Lady trio

NailaDay: Andrea Fulerton Foxy Lady trio

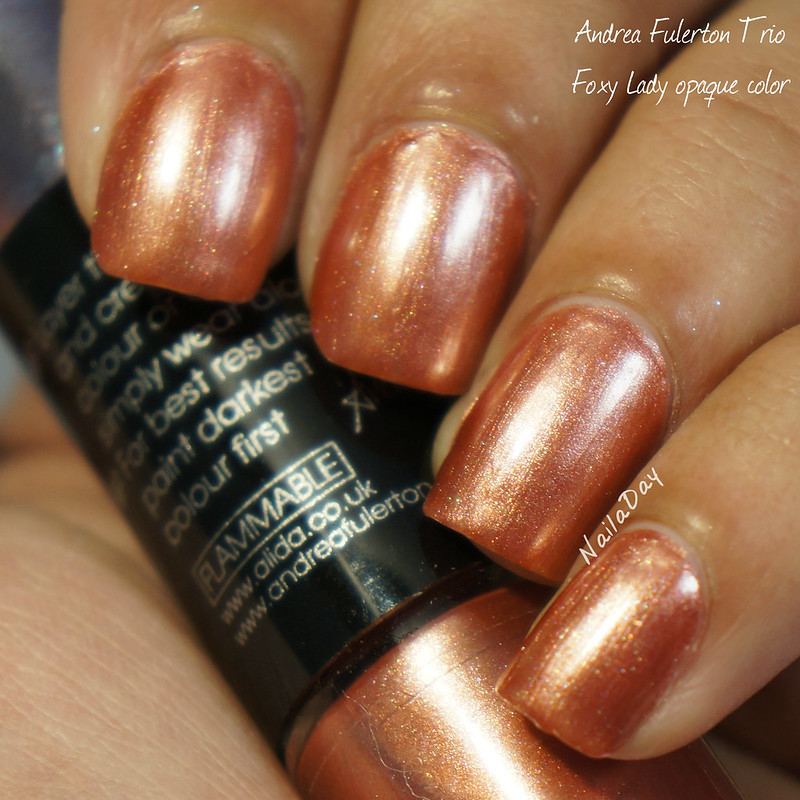
The color above is the more opaque polish in the trio. It is not a color I would chose for myself if it came alone. It's a metallic copper peach color that has a weird tendency to look sometimes okay and sometimes dated on my nails. My nails were pretty short at this time so maybe that was in favor of the polish. I think if my nails had been longer the color may have looked more dated. This was two coats and showed more brushstrokes than I would have liked. It did have a nice sparkle in the sun though. That part I liked.

NailaDay: Andrea Fulerton Foxy Lady trio

NailaDay: Andrea Fulerton Foxy Lady trio


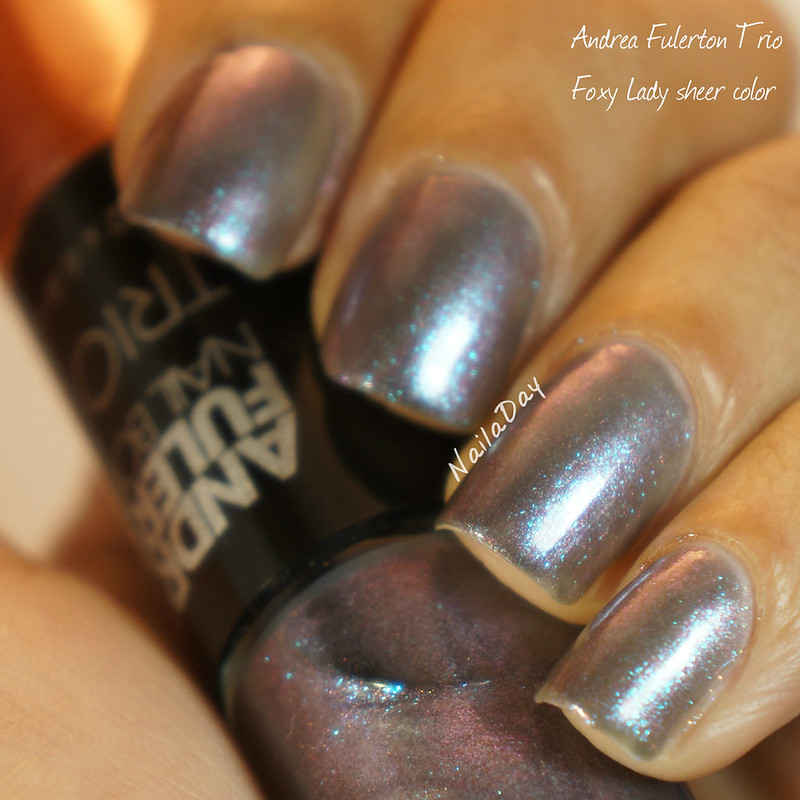
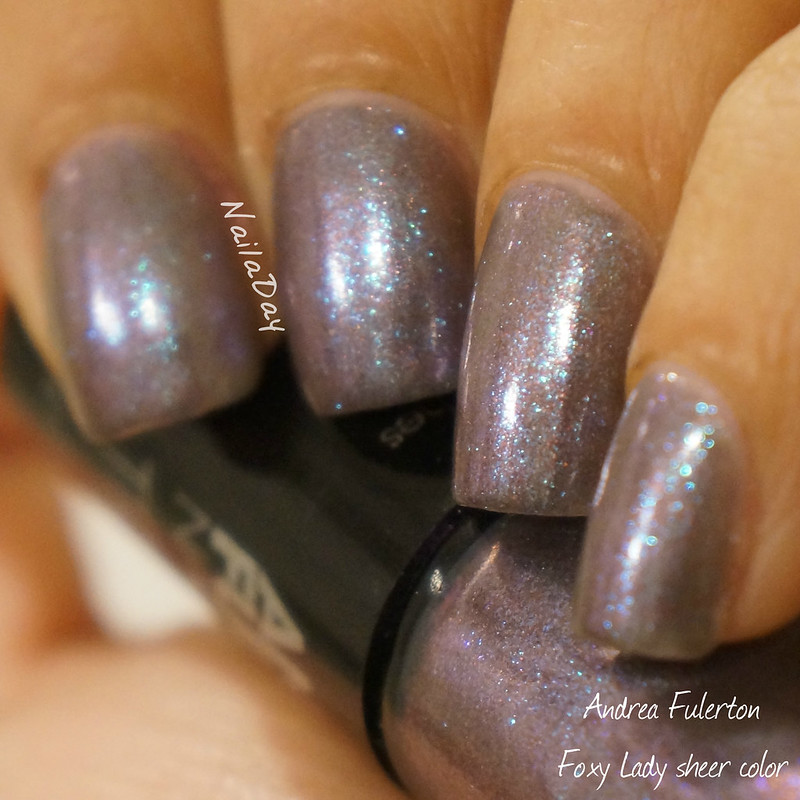
The second polish in this trio is a strange one, in a good way. Overall the color could be described as a dark grey but it had shimmer in it that took it to a whole different level. I loved this shade!! Being the more sheer polish in the set, it did take three coats for complete opacity but I have several stand alone polishes for which that is the case so that wasn't a deal breaker.

NailaDay: Andrea Fulerton Foxy Lady trio

NailaDay: Andrea Fulerton Foxy Lady trio


More pictures of the second polish above. The shimmer in this one is beautiful. Head on, the polish is an elephant grey color but the microscopic particles in it tease you with a color shifting palette that runs from a light blue color to a fushia purple at the edges. This takes an overall simple grey to one that has a hint of purple in it all the time, making it look like a very dusky lilac. I loved wearing this one.

NailaDay: Andrea Fulerton Foxy Lady trio

NailaDay: Andrea Fulerton Foxy Lady trio


Finally, I did what I was supposed to and wore them layered to get my third polish. I wore the grey polish over the copper. I hated it. It doesn't look too bad in the pictures but in person I thought it was a disaster. The formula of the grey color wasn't so good that it went on completely streak free at one coat, despite my best effort. This caused it to look patchy and uneven over the peach color, so that sucked. I realized I disliked the peach color even more when it was grayed out like that. Finally, the duochrome quality of the grey polish was completely lost when layered over the metallic peach. So yeah, this is not how I will be wearing it in the future.

When I saw this in the store, I picked it up because the grey polish in this trio looked very unique. I was right about that. I could have done without the coppery peach and I was right about that too. I'm sure I could use it in nail art at some point in the future so I'll have to work on that.

Once again, thanks for looking and see you next time! Wish us luck with daycare! 

Monday, June 15, 2015

Born Pretty Review - water decals

Hi everyone!
I have another review post for you today.  I'm reviewing some water decals from the Born Pretty Store. Until this mani, I had never used any water decals or nail strips of any kind. I was a little apprehensive to say the least. I thought I was going to go through many tries and waste a bunch of this product before I got something I was happy with. Not the case!! I managed to "nail it" almost right away!

NailaDay: Black and White Skittlette using Born Pretty Store water decals

To create this nail art look I used these water decals below. They have strips of lace pattern in both white and black on the same sheet. You can't see the white colored pattern below because it blends in with the background paper. The black polish I used was Sally Hansen X-treme Wear Black Out and the white was Sally Hansen X-treme Wear White On. The silver was Zoya Trixie. I find all three polishes amazing for what they are and very easy to use.

NailaDay: Black and White Skittlette using Born Pretty Store water decals

Using the actual decals is very easy. Make sure your polish is dry before using the decals. 
     1. Measure and cut out of the portion of the decal that you will be using on your nail. 
     2. REMOVE the clear film on top of the design
     3. THEN place the design in a cup or bowl of water for several seconds, up to half a minute.
     4. Peel the design off the backing with a pair of tweezers and place over your nail.
     5. Align the design properly right away because it may be hard to adjust once it's already on the nail. I found it helped to dip my nail in the water as well and have a large drop of water under the design as I was aligning it. 
     6. Once the design is where you like it, press firmly to get rid of any bubbles of any kind (air/water)
     7. Cover with a coat of topcoat once the nail is dry.

The only flub I kept making was to forget to remove the clear protective film over the decal before putting it in the water. The first time, I remembered within a second of putting it in the water and I was able to fish it out, take off the film and put it back in the water. The second time, I completely forgot and ended up having to peel the design off the plastic film instead of the paper backing. Still salvaged it!!

A few more pictures for your enjoyment....

NailaDay: Black and White Skittlette using Born Pretty Store water decals

NailaDay: Black and White Skittlette using Born Pretty Store water decals

NailaDay: Black and White Skittlette using Born Pretty Store water decals

Here's a picture of the base before adding the decals.

NailaDay: Black and white skittlette using Born Pretty Store water decals

Hope you liked this review and hopefully, if you've been like me, unsure of water decals, you'll be more encouraged to try them out after this post. If you're thinking of getting them from the Born Pretty Store, you can use my code "PRK31" for a 10% discount on your order at checkout. 

Thank you for looking!!

*items in this post were provided to me for honest review*


Thursday, June 11, 2015

My first mermaid nails with Barielle A Bouquet for Ava

So, I have been busy this week. We went to the zoo last weekend and two days ago, we went to the aquarium. I'm pretty sure the kids don't care one bit since they're so young but I've been having a blast! So, in honor of going to the aquarium, I did my first mermaid nails! I'm pretty proud of how they turned out too!

NailaDay: Mermaid nails with Barielle A Bouquet for Ava

For this look, I used Barielle A Bouquet for Ava, which is the darker teal. I did a gradient with Barielle Swizzle Stix and A Bouquet for Ava and went over the tips with Sinful Color Nail Junkie. I then stamped over the gradient with the fish scale stamp from the Red Angel plate RA111. The stamping polish I used was China Glaze Passion from the Romanitique collection. All of the ones from that collection are great to stamp with. 

NailaDay: Mermaid nails with Barielle A Bouquet for Ava

NailaDay: Mermaid nails with Barielle A Bouquet for Ava

NailaDay: Mermaid nails with Barielle A Bouquet for Ava


Here's a visual of the polishes I used.

NailaDay: Mermaid nails with Barielle A Bouquet for Ava

I love stamping over gradients. It may be my new favorite thing next to a watermarble accent if I can afford the time. What's your favorite nail art style?

Monday, June 8, 2015

Salon Perfect Brown Sugar Zoo Skittlette

We had a fun weekend here this past weekend! We took the munchkins to the zoo. The little one is two months old and slept through the whole trip but my almost two year old toddler loved it! I had done my nails for the occasion so I'll show you that in this post.

NailaDay: Salon Perfect Brown Sugar Zoo Skittlette


NailaDay: Salon Perfect Brown Sugar Zoo Skittlette

NailaDay: Salon Perfect Brown Sugar Zoo Skittlette

This is one of my favorite manis I've done in a while. You can see all the polishes I've used below. The brown is Salon Perfect Brown Sugar, which I think is a dupe for China Glaze Midtown Magic. I have both, and I love it so much that I don't mind that I have both! The gold sparkly nail is done with Polished by KPT Triomphe-nt Night from the Paris collection. The animal print accent nail is done by randomly sponging the two above mentioned polishes along with OPI Rollin' in Cashmere and Sally Hansen Copperhead onto Orly Powder Puff, my favorite off white base for nail art. I really wasn't sure about OPI Rollin' in Cashmere in the bottle when I first got it. I got it in a package with Comet in the Sky and Snow Globetrotter. When I sponged it over the other colors though, it gave it a lovely satiny gold look and I can see myself using it in nail art quite a bit in the future! The image for the stamped accent nail is from the MASH plate m78. 

NailaDay: Salon Perfect Brown Sugar Zoo Skittlette

NailaDay: Salon Perfect Brown Sugar Zoo Skittlette

NailaDay: Salon Perfect Brown Sugar Zoo Skittlette

I posted a picture me wearing this mani and my two little boys in the background on my Instagram account. If you also have an Instagram account, look me up!

Again, thanks for looking!


Sunday, June 7, 2015

Accessorize Peony and Jupiter

Hi everyone! Alright, in this post I'm going to show you the last two Accessorize polishes I have. Both silver based microglitter polishes. Both of these polishes have thick formulas and didn't feel entirely smooth even after topcoat. I'm not entirely sure they weren't meant to be texture polishes but it didn't look like they were advertised as such.

The first polish I'll show you today is Peony. It's a pretty pink silver microglitter. This one took two coats for coverage. The thickness of the polish did make it slightly difficult to apply.

NailaDay: Accessorize Peony

NailaDay: Accessorize Peony

The second polish I'll show you today is called Jupiter. It's an interesting one with tiny blue and red microglitters among mostly silver glitters. 

NailaDay: Accessorize Jupiter

NailaDay: Accessorize Jupiter

The sparkle factor in both of these was good but not a high as I was expecting. I think they'd be fun to stamp over and I'll have to try that next time.


Friday, June 5, 2015

Accessorize Ultra Marine Green and Mineral Violet

Hi everyone! I'm going back to showing you guys swatches of my Accessorize polishes. This time I'm going to show you two polishes that are metallic duochromes Ultra Marine Green and Mineral Violet

In the interest of full disclosure, I need to let you guys know that I'm going to be going back and forth between older manis and swatches (not too old) and the most recent stuff. Because of that, you eagle eyed viewers are going to notice that my nails are going to look different in these pictures in terms of length and shape from post to post. So, sorry if that gets annoying. It'll be that way until I get caught up with my backlog of pictures.

This first polish, Mineral Violet, is a purple duochrome that shifts to a grey at the edges. This polish took three coats for coverage. It looks like this polish is a dupe or at least very similar to China Glaze No Plain Jane. The pictures make it look more brushstroke-y than it is in real life. I really liked this polish on me. It's a chameleon polish in that it changes the way it looks depending on the lighting it's under. You can see that it looks slightly different in each of the pictures below.

NailaDay: Accessorize Mineral Violet

NailaDay: Accessorize Mineral Violet

NailaDay: Accessorize Mineral Violet


This next one, Ultra Marine Green, is another one of those gold green shifters (I must have been really into those two years ago), that is heavier on the green. Also three coats and more brushstrokes seen in the pictures than in real life.

NailaDay: Accessorize Ultra Marine Green

NailaDay: Accessorize Ultra Marine Green

NailaDay: Accessorize Ultra Marine Green

Again, the above pictures are taken under different lighting conditions and you can see how it looks different each time. It's so shifty, I love it. I don't think it's the greatest color for my skin tone but there's something about that color I really like so I'll keep it around for a while. It's got an amazing shine in the sun!

So what do you guys think? Now that the fuss is all about the ultra ultra multi holo uber chromes (okay that's not really what they're called but they may as well be), is there still a place for these simple mild mannered duochromes? I think so. See you next time!


Wednesday, June 3, 2015

Born Pretty Store stamping plate review Qgirl-016

Hi everybody! My Born Pretty Store review samples are here!! As a blogger who hasn't really received many samples for review in the past, I am inordinately excited to show you what I received. I will show you one manicure I did with the samples I received today but I'll show you more as time goes on. I have so many ideas!! Here's a sneak peek at what I received in the mail. A couple of stamping plates and a couple of water decals. I have never tried water decals before so I'm excited to try them out!!

NailaDay: Born Pretty Store stamping plate review Qgirl-016

For today's look, I went for a simple stamped manicure. I used the plate Qgirl-016 which looks like this:

NailaDay: Born Pretty Store stamping plate review Qgirl-016

It comes with a blue film that you have to remove to start using the plate. I went with a full nail design using the flowers on the top left corner of the plate. The base for this manicure is another Born Pretty Store holographic polish #12. It is a dark green holographic polish with the slightest lean towards being a dark teal.

NailaDay: Born Pretty Store stamping plate review Qgirl-016


NailaDay: Born Pretty Store stamping plate review Qgirl-016

Both of the above pictures were taken in my lightbox. The pictures below are in direct sunlight.

NailaDay: Born Pretty Store stamping plate review Qgirl-016


NailaDay: Born Pretty Store stamping plate review Qgirl-016

You can see the holo flame a little better in sunlight. In the interest of time (baby crying), I will show you the polish separately in a different post. I liked using this plate quite a bit. I stamped using Konad white stamping polish and the stamper I used is the round squishy stamper with the black body. Any mistakes you see are probably my fault rather than the fault of the plate. The etching seemed deep enough and all of the designs on the plate look very usable.

You can buy this exact plate here. To see other stamping plates and other nail art items visit the Born Pretty Store website. You can use the code "PRK31" for a 10% discount on your order at checkout. The code is not applicable to items that are already discounted.

I hope you enjoyed this post and stay tuned for future reviews of the items I showed you at the beginning of the post!

*items in this post were provided to me for honest review*

Tuesday, June 2, 2015

Accessorize Damselfly


Today I have the third and last of the speckle polishes I own by Accessorize called Damselfly. You can see my other two, Ladybird and Dragonfly, in prior posts. This one has got to be my favorite of the three so you'll get to see a lot of pictures.

NailaDay: Accessorize Damselfly


It's a sky blue creme polish with uniform glitters of dark blue and gold within it. It looks soooo lovely on my nails!! I didn't want to take it off. All of the polishes seem to have insect themed polishes but I didn't know what a damselfly was...so I looked up courtesy of Wikipedia. Here is a representation of this insect. It's pretty and I think the polish captures its colors really well!

Image Credit: http://en.wikipedia.org/wiki/Damselfly
NailaDay: Accessorize Damselfly

I've since discovered that this polish is also a dupe for Nails Inc Pudding Lane so...yay! Here's more pictures to entertain you.

NailaDay: Accessorize Damselfly

NailaDay: Accessorize Damselfly

Hope you enjoyed my trio of Accessorize speckle polish posts. I have more Accessorize polishes coming up in future posts but they'll be different finishes from this one.

Thanks for looking!!

Monday, June 1, 2015

Accessorize Dragonfly

Continuing with the Accessorize brand, today I'm going to show you the second of the three Speckle polishes I own from this brand. These came out in 2012 and that's when I picked them up when I went on a vacation to London. This one is called Dragonfly.


NailaDay: Accessorize Dragonfly


I love the green shade of this polish quite a bit. Not all green shades work for me but this one was pretty and complimentary. It's a muted green but it's got a jade like look and the purple glitters in it really make the whole thing stand out. 


NailaDay: Accessorize Dragonfly

I wore three coats to get the look here. The glitter density is good as you can see here and I had no trouble getting them on my nail or getting them to spread evenly. This is a good spring shade. As the name implies, I can imagine the purple glitter as the dragonflies fluttering among the green of the grass.

NailaDay: Accessorize Dragonfly

All in all, I really loved it. I liked it better than the last one I showed you, Ladybird. I saved my favorite of the three speckle polishes I own for last, however. I will show you that one in my next post! Stay tuned :-)

Related Posts Plugin for WordPress, Blogger...